Tuesday, January 31, 2012

"It's a Major Award!"


I'm so honored to have been chosen by my friend Holly
 to receive a blog award.

She's overflowing with talent and just happens to be
one of the sweetest people you will ever meet.

If you are not following her yet, well what are you waiting for?


Thank you, Holly!


Liebster is German and means 'dearest' or 'beloved' but it can also mean 'favorite'.
 The idea of the Liebster award is to bring attention to blogs with less than 200 followers. So, in the spirit of good fun I am passing this award on to five other bloggers.
 Please stop by and visit them!

The Rules are:
1. Show your thanks to the blogger who gave you the award by linking back to them.
2. Reveal your five picks for the award and let them know.
3. Post the award on your blog.
4. Bask in the love from the most supportive people on the blogshare-other bloggers.
5. Finally and the best rule of all . . . . have fun and spread the love!

Here are the 5 blogs that I would like to share with you :

Jenn at jennsdoodles

I hope you'll check out their amazing work. 
They inspire me often and I know they'll inspire you, too!
-----------
(If you got my A Christmas Story reference from my title
you can consider yourself one of my coolest friends.)

Monday, January 30, 2012

Baby Boy Easel Card

When I saw this tutorial at Splitcoaststampers for an easel card,
I knew I had to give it a try.

It looked a little intimidating, but was actually a piece of cake!

I'm very pleased with my first attempt and will let the pictures speak for themselves :


Adorable, right?

I'm entering this card in the weekly challenge over at Sugar Creek Hollow.
It's a color challenge this week using cream, blue, and brown.
And since that is one of my favorite color combos I had to jump on board.

That precious vintage image is from The Graphics Fairy.
I can't say enough wonderful things about her gorgeous images.

Products Used:
DCWV matstack : Linen Closet
Prima pearls
ZVA Creative bling
Spellbinders Fleur De Lis Squares & Eyelet Circles
Tim Holtz Distress Ink : Tea Dye
Liquid Pearls : Platinum


Saturday, January 28, 2012

A Good Life

I made this wall plaque for a very special lady
who doesn't hear often enough just
how wonderful she is.


It's a 5x7 wooden plaque. 
I stained the edges with Tea Dye Distress Ink

Then I cut to fit some G45 paper (My Beloved)
and Mod Podged it onto the wood.

I printed the sentiment out and Mod Podged that as well.


I used Glossy Accents to adhere the tag.


I hope it makes her smile.

Products used:
Spellbinders Rose Creations, Foliage, and Labels One
Studio G Chalk Ink
Ranger Distress Ink
Graphic 45 Le Romantique "My Beloved"
Prima Flowers
ZVA Creative bling


Giveaway from The Paper Variety!


Fancy Pants "Winterland"

"Like" them on facebook for your chance to win!

And check out their blog:


It's full of awesome!

Friday, January 27, 2012

Masculine Birthday

Happy Friday, friends!

I have a masculine birthday card to share today.
I will be the first to admit that I stink at masculine anything.
I love flowers and ribbons and bows and it's HARD to leave all of that fun stuff off.


I came across a challenge at The Paper Variety to 
use a rosette (fan fold) on your project.


Yes! I can make that masculine!
And it's still kind of like a flower!


Ignore the flowery Basic Grey paper. 
I tried, I really did.


Hop on over to The Paper Variety
to see some fabulous examples of rosettes.

Products used:
Basic Grey - Little Black Dress
Tim Holtz - Lost and Found
Martha Stewart Scoring Board
Tim Holtz Distress Ink - Pumice Stone
Charms - Making Memories
Border Punch - Fiskars


Thursday, January 26, 2012

Winter Fun!

Winter?
Okay, okay. Stop laughing.
 Just because we have no winter here in sunny south Florida
does not mean I can't make fun little snowman cards!


I'm entering this one in a challenge over at 
{PTT#52-Color & Picture Inspirations Challenge}

I discovered PTT through my friend Holly's blog

If you don't follow her, you need to, because her work is AMAZING.


These cute little snowmen were leftovers from some holiday projects I did.
I added some Liquid Pearls to their little hats.
Yes, that's DoodleTwine. Isn't it fun?
I was flipping through my paper for a coordinating background
and was left speechless by the gorgeous Prima North Country that I've been hoarding.
It hurt to cut it, but I love the way it looks on this card.

The big snowflake is from Michael's,
I think it's supposed to be one of those mini tree ornaments.
The little snowflakes are re-purposed from a Christmas card I received. 
I covered them in ink (Pumice Stone) and a dot of Liquid Pearls in the center.

Thanks for stopping by, and be sure to check out 
for some fun weekly challenges!


Wednesday, January 25, 2012

Vintage Baby Card

I stopped in at Sugar Creek Hollow
and saw that their current challenge is to create
a shabby chic, vintage, or primitive card that is feminine in style.

This week's challenge is titled Go Girly and you can read more about it here.


So I came up with this adorable baby card.


Isn't that the sweetest image you have ever seen?
I found it here.


Now I just need to find someone who is having a girl.

Thanks for stopping by!

Products used:
pinkpaislee Nantucket
Spellbinders : Postage Stamps, Fleur De Lis Squares and Labels One
Tim Holtz Distress Ink : Vintage Photo
Flowers : Prima 
Hinges : dee's design's
Punch : ek success
miscellaneous beads, ribbon and background paper


Tuesday, January 24, 2012

Two for One! *Flower Tutorial*

Today I'll show you how to get 2 flowers from the same die. 


Using Spellbinders Spiral Blossom One.


Choose your paper and run the die through your machine.


This is what you get after using the tan mats to emboss.


You can stop here, roll it up and have one MAGNIFICENT flower.
I took it a few steps further to have a flower that was a little flatter and a little smaller, 
making it easier to work with layouts and cards.

If you're going to ink the edges, do it now.
Use a little, use a lot. There are no rules in inking.


Start cutting in the middle of the spiral, making sure to follow the "humps".

(Humps?)


Go all the way around.


And you're left with two spirals.


Start rolling, beginning with the outer end.


Unroll the "fancier" one and adjust the petals to your liking.
I like to use my paper piercer because it's the perfect size.


This is what you'll be left with . . . roll it up again.


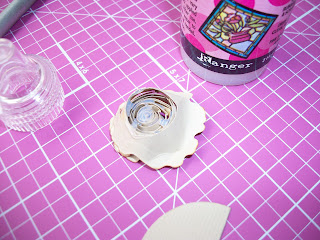
Turn it over and apply adhesive to the bottom (I LOVE Glossy Accents).
Adhere to a small scrap of paper.
 You can trim any excess paper off when it dries
and this makes it so much easier to attach to a layout or card.


Add a small dab of adhesive to the end of the other spiral.


Attach it to a scrap, wait til dry, and then trim any excess away.


And that's it! 
Two very different looking flowers from the same die.


You can also cut the strips in half to create even smaller flowers!

Friday, January 20, 2012

Winner Winner Chicken Dinner!

Let me preface this by saying I never win anything. 
Contests, design team calls, the lottery . . . .

So when I was notified that I was the random winner of a scrappy giveaway
I may or may not have danced around my dining room like a deranged chicken.


Gorgeous papers from October Afternoon, a chipboard book, ribbon,
stamp, stencils, bling, and Prima out the wazoo. 

I can't wait to get started on the chipboard book, it's SO adorable.

Well, guess what? Jolaine is having another giveaway!


I'm sitting this one out since I just won, but you need to go over there RIGHT NOW and try your luck.

All you have to do to enter is become a follower of her blog and leave a comment.

Good luck!


Wednesday, January 18, 2012

beautiful LOVE

I have a few projects looming, and instead of tackling them head on I got sidetracked by flowers.

It's always something for us crafters, isn't it?


I made all of the flowers, except the white ones. They are Prima.
 They were part of a FABULOUS giveaway package that I won.
 I'll have more pics of that scrap candy tomorrow, in the meantime you can check out Jolaine's blog 
she does absolutely AMAZING work.


I used the Spiral Blossom One die from Spellbinders.
To make them more suitable for a layout (because they are HUGE),
I cut the half off the height before I started rolling.
I was able to make two different types of flowers this way.
I then dotted them with Glossy Accents to make them look "wet".
A tutorial will come later this week with more detail. 


Of course the Le Romantique by Graphic 45 made me immediately reach for my
hoard of wedding photos. I don't do layouts very often,
but this paper is so gorgeous that I couldn't help myself.
I think I need a G45 intervention!

"Love" in the title was created using my Cricut and "A Child's Year" cartridge.

I used stencils (also part of my prize) as a mask with some chalk ink, so fun!


I'm getting better with the Liquid Pearls, I now need every color they make.

There is also a little Basic Grey in here from Little Black Dress and DCWV Linen Closet.

Vintage Photo Distress Ink and my Tim Holtz Paper Distresser got a lot of use.

Pearls by Prima and the butterfly punch is Martha Stewart.


Thanks so much for the taking the time to see what I've been up to.
All of your comments really brighten my day!


Tuesday, January 17, 2012

G45 Love

A simple "I Love You" card today. 


Graphic 45 Le Romantique
Spellbinders Fleur De Lis Motifs
Spellbinders Lables Eight
Prima pearls
Tim Holtz Distress Ink - Vintage Photo


The background paper was a plain piece of peachy cardstock that I crumpled up, wet, crumpled again, then inked.
An "oldie but goodie" technique to add a bit of texture to an otherwise boring background. 
Try it. It's messy and fun.
It's also great to add a layer of Glimmer Mist on top!

Wednesday, January 11, 2012

Soft & Dreamy

Is love in the air? 
Because I can't seem to break out of these soft, romantic cards.
(If you know me, you know I don't do soft. Or romantic.)


The paper is from Webster's Pages - Hollywood Vogue & WonderFALL.

And it's gorgeous, isn't it?


The little type sticker and rub-on are from my stash, I thought they made a great sentiment.
Butterfly punch by Martha Stewart & Fleur De Lis Motifs by Spellniders.
The leaves are Petaloo.

Now let's talk about the flowers.


Spellbinders Shapeabilities : Spiral Blossoms One

I won't even pretend that these were easy to make. Or even fun, at first.

They did not want to do what my brain wanted them to do,
but after much rolling and folding and swearing I am very pleased with the results.

The larger flowers are actually the same size strip, the one on the right is just more tightly rolled.
New ink on that one - Pumice Stone Distress Ink. I think it's my new favorite.

I cut a strip in half to create the little bud and wrapped some hand cut paper leaves around it.

I highly recommend this die if you like a challenge.

I found a lot of reviews online saying it was *so easy*. 
Well, it is, after you figure out how it's done.
So, go get it.
You'll love it.
Eventually.